Learn how to make your very own rye starter from scratch with 2 simple ingredients – equal parts rye flour and water! A rye (sourdough) starter can completely replace store-bought yeast for all of your rye baking projects!

A Rye Starter may be the perfect option for you if you’re sensitive to wheat and gluten since rye is much lower in gluten.
Sourdough is all the rage these days, but back in 2017 when I made my first starter, that wasn’t the case. I didn’t even know what a sourdough starter was, but we were building our farmhouse and planning our move to the farm, so my days were filled with researching all things farm and homestead on Pinterest. That’s how I first came across the concept of using a sourdough starter instead of commercial yeast for baking.
It immediately made sense, after all – bread has been around for ages and isolated yeast has not. So of course, there had to be some other way to leaven bread. I was surprised to discover just how simple the concept was. A sourdough starter is nothing more than a mixture of fermented water and flour that traps wild yeast and bacteria from the environment and produces gasses for leavening.
Home bakers have been keeping sourdough starters for thousands of years. In the bible, when you read about “leaven” – that’s an active sourdough starter! My husband’s grandma said her mother kept a big one at all times and she remembers people stopping it to get a scoop here and there. But she said “back then, we just called it yeast.”
Since 2017, I’ve kept my original sourdough starter going strong. But I’ve also experimented with different kinds of starters – including an all-einkorn starter, a whole wheat starter, and a rye starter – which is what we are going to make in this recipe!
I actually use whole rye flour in my main sourdough starter every day when I feed it. Rye is such a wonderful addition to any starter, whether it’s entirely made with rye flour or a mix of rye and all-purpose (my choice).
I may receive a small commission for items purchased through affiliate links in this post at no additional cost to you.
What Exactly is a Rye Starter?
A rye starter is a fermented mixture of water and whole rye flour that’s used as a leavening agent for making sourdough rye bread, buns, and all kinds of rye baked goods. It contains wild yeast and lactobacilli bacteria, which naturally occur in the environment and on the grains used in the starter.
These microorganisms consume the carbohydrates in the flour and produce carbon dioxide gas and lactic acid as byproducts, resulting in a tangy flavor and leavening action in whatever dough you’re working with.
A starter is typically maintained by regularly feeding it with fresh flour and water to keep the yeast and bacteria active and thriving.
Why Make A Rye Starter?
Back in the 1850’s Louis Pasteur became the first person to isolate a single strand of wild yeast, thus leading to the mass production of commercial yeast – the stuff we buy at the store.
Before that time, the only way to leaven bread and baked goods was by harnessing the simple power of water + the air + grain, a.k.a. keeping natural yeast (a sourdough starter.)
Wild yeast converts natural grain starches and sugars into CO2 which makes air pockets and leavens the dough. The cultures also contain healthful lactobacilli that convert proteins such as gluten into lactic acid and make it easily digestible and the many beneficial nutrients bioavailable.
Man-made, isolated, single-strand yeast doesn’t do any of this, which is why most modern bread and grain recipes call for added sweeteners such as cane sugar. (My favorite Amish Sourdough Bread Recipe does! I’m not trying to knock anything here or be dogmatic – just sharing some differences)
The added sugar feeds the yeast to give it rise, meaning that the natural starches and sugars in the grain don’t get broken down. Leaving us to consume fully intact, non-bioavailable, difficult-to-digest grain proteins.

I think this could be why a lot of people have gluten intolerance. I’ve heard of many people switching to ancient grains and a sourdough starter, then being able to consume bread and wheat again!
Keeping a rye starter is perfect for those who enjoy making all-rye sourdough bread or who can’t tolerate white flour and want to use a rye starter to leaven sourdough bread recipes made with ancient grains. Rye contains a lot less gluten than wheat bread flour or barley so rye sourdough bread is a great alternative for those with gluten sensitivity.
What You’ll Need to Make Your Own Starter
INGREDIENTS
you will need these ingredients every day for 8-12 days.
- 1/3 Cup (43 grams) whole-grain rye flour
- 1/4 Cup untreated Water (59 grams) (tap water is ok if it’s well water, but treated tap water may not work well. If you do not have well water, bottled spring water or filtered water is best)
TOOLS
Large glass or stoneware jar or bowl
Wooden spoon
Step-by-Step Instructions
Use warm water if possible, but make sure it’s no warmer than 110F. The whole process of making a rye starter for the first time takes 8-12 days.
Day 1
First step: In a glass or stoneware jar or bowl, combine 1/4 Cup water with 1/3 Cup rye flour (43 g rye flour). Stir with a wooden spoon until the flour is totally mixed into the water. The mixture will be a bit thick but should be easy to stir.
If the starter seems too thick or clumpy, slowly add 1 T of water at a time until you reach the right consistency. If too thin, add 5 g flour at a time.
Cover with a loose-fitting lid, tea towel, or doubled cheesecloth. If air can’t get in, fermentation activity won’t happen. I love this big weck jar for keeping my starter because I can just set the glass lid on top without the sealing ring and it works perfectly.
Now that you’ve stirred water + flour together in your container and covered it, you’re finished for day 1.
Set the starter on your kitchen counter at room temperature until day 2.
Day 2
Uncover the starter and remove half of the contents, discard what you remove. You can toss the discard, add it to your scrap bucket for chickens/pigs/etc., or use it in sourdough discard recipes like these sourdough discard pancakes. This discarding step is the only step that’s different than day 1. It is not necessary to use a clean jar every day when you discard and feed the starter, continue using the same jar or bowl.
Discarding half of the mixture is only necessary when you are establishing a new starter. Once the starter is mature, you will not need to discard half. You can just continue feeding it every day, but keep in mind that if you feed it daily without using any, you’ll end up with a ton of starter and need a very large container.
Next, add 1/3 cup of flour and 1/4 cup water to the remaining contents of the starter & stir until well combined.
The flour-to-water ratio may be different than mine if you use a different flour, and that’s okay.
Cover and store the starter on the counter just like on day 1.
Days 3-7
Repeat the steps from day 2.
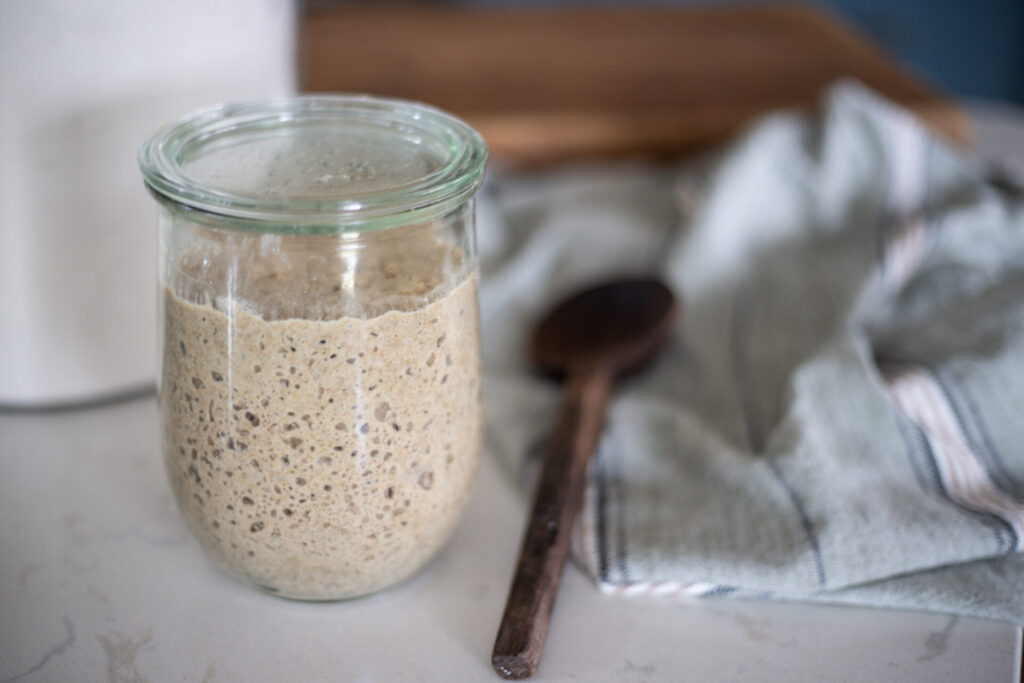
After a few days, you should notice that your starter almost doubles in size every 12-24 hours when after feeding it. You should also notice air bubbles on the top and that distinct sourdough smell.
When it has risen to its highest point, this is called the “peak.” After the starter peaks, it will slowly fall back down to where it was when you originally fed it, then it is ready to be fed again.
If you notice your starter is “peaking” quickly (which is more likely to happen in the summer when your house is warm or if you store it in a warm spot) you may need to discard and feed more frequently than every 24 hours.
If a starter peaks, falls, and sits for too long before being fed again, it may develop a “hooch” which is a thin layer of water near the top. Don’t worry if you see this, it just means your starter is hungry and needs to be fed more frequently. Just dump the water when you discard, feed the remaining starter, and adjust your feeding schedule so it is fed more frequently.
If you are feeding frequently, but not seeing much action or the starter develops a hooch every time it peaks and falls, try adjusting the flour-to-water ratio to increase the amount of flour so the starter is thicker when you feed it.

Day 8
By now, the starter should be mature enough to attempt baking bread. It should peak 8-24 hours after feeding, have lots of bubbles, and have a sour, tangy smell. For the best results, the most important thing is to use the starter in sourdough recipes when it is “peaked.” Once it falls, feed it and let it peak before using it again or it will take a long time to leaven the dough.
Skip ahead to the maintenance section to read more about what to do with your new sourdough starter now that it’s mature and ready to use for leavening and making homemade bread.
FAQ
What is a rye sourdough starter?
A rye sourdough starter is a fermented mixture of water and rye flour that’s used as a leavening agent for making great rye bread. It contains wild yeast and lactobacilli bacteria, which naturally occur in the environment and on the grains used in the starter.
How do I make a sourdough starter?
To make a rye sourdough starter, mix 43 grams rye flour and 59 grams water in a jar, cover with a loose fitting lid, and allow to ferment at room temp for 24 hours. Discard half of the mixture after the 24 hours is up, “feed” the starter the same measurements of water and rye flour again, cover with a loose fitting lid, and allow to ferment at room temp for 24 hours. Repeat this process of discarding, feeding, and fermenting for 1-2 weeks and you will have a mature rye sourdough starter ready to bake with.
How long does it take to create a rye sourdough starter?
It takes 8-12 days to create a mature rye sourdough starter that is ready to use as a leavening agent to bake bread or various baked goods.
What ingredients do I need to make a sourdough starter?
Only two ingredients are needed to make a sourdough starter – rye flour and water.
How often should I feed my rye sourdough starter?
A rye sourdough starter “peaks” (doubles in size) 8-24 hours after it is fed. Once it peaks, it will slowly fall to its original level. Once it has fallen, it needs to be fed again within a few hours.
Can I use whole wheat flour or other types of flour to create a sourdough starter?
Various types of flour can be used – all-purpose flour, whole-grain flour, rye flour, ancient grain flour, etc. Just make sure the flour is unbleached.
How do I know if my rye sourdough starter is ready to use?
A rye starter is ready to use when it “peaks” 8-24 hours after feeding, has lots of bubbles, and a strong sourdough smell.
Can I use tap water to feed my sourdough starter?
Yes, you can use tap water to feed a sourdough starter as long as it is not treated. If your water is treated, filter it first.
Tips
Temperature matters. A rye sourdough starter will peak faster at higher temperatures, so store your starter in a warm place – but not too warm or it will kill the bacteria and yeast – no warmer than 110F. In the winter, I use a proofing box set at about 80F when I need my starter to peak faster. In the warmer months, it peaks quickly on the kitchen counter.
Keep bugs out. Use a rubber band or piece of twine to fasten the cloth around the neck of the jar you use to store your rye sourdough starter. This will prevent fruit flies from getting into the starter.
Test the starter. Perform the float test to see if your rye sourdough starter is ready to use. Just drop a spoonful of sourdough starter into a cup of water. If it floats, it is ready to use.

Less can be more. I have found that I have the best result when I keep only as much starter as I need. When I am ready to bake, I use almost all of the active starter so that all that’s left in the jar is a very small amount (called the “scrapings”). I feed this tiny amount of starter and it peaks up perfectly.
Hydration matters. Certain recipes will call for higher or lower hydration starter. The level of hydration of your starter just refers to how much water is in it. A lower hydration starter has less water, so it is thicker. A higher hydration starter has more water, so it is thinner. I prefer a higher hydration, thin starter for making pizza crust. But I prefer a lower hydration, thicker starter for making artisan bread.
Don’t throw it away. Sourdough starters are incredibly resilient and adaptable. They are almost impossible to kill. If your starter isn’t performing well, some adjustments may need to be made to the feeding schedule, type of flour or water, ratio of flour and water, storage temperature, etc.
But don’t throw it away and start over! Just work with what you have. The only time I would throw a sourdough starter away is if it was black and moldy from top to bottom. Even if the top of the starter looks scary or a few bugs get in, just pour as much off the top as you can, transfer a tiny bit from the bottom into a clean jar, feed it, and proceed as usual.
I have been keeping a starter for over 6 years and have never had to start over. I even accidentally baked my starter jar once! Luckily, there was a tiny little bit of the middle that was still liquid. I salvaged that little bit, fed it, and it was good as new!
Maintenance
Feeding A Rye Sourdough Starter
A rye sourdough starter needs to be fed every 12-24 hours if it is stored at room temperature on the kitchen counter. If stored in the refrigerator, it only needs to be fed weekly. Remember, “feeding” a rye sourdough starter means adding more water and flour. You can feed it a lot, or a little, depending on how much starter you need for any particular recipe.
If I know I will be baking sourdough pancakes, which calls for one cup of starter, then I only feed as much flour and water as is needed to have a cup of starter when it is peaked. If I will be bulk baking several loaves of sourdough bread, meaning I will need several cups of active, peaked sourdough starter – then I feed a lot of flour and water so I will have enough. It only takes a tiny little bit of mature starter to work through a ton of flour and water and activate it within a few hours so it is peaked and ready to use.
Countertop Storage
This is the best option if you’ll be using your starter every day or even every other day. Just remember that a sourdough starter stored at room temperature needs to be fed every 12-24 hours to remain healthy and active.
Just as seasons change, so will your starter. In colder temperatures, if you notice a less active starter, you can get by with fewer feedings – perhaps even every other day at room temperature.
At warmer temperatures, you may need to feed the starter twice a day to keep it active and healthy.
You do NOT need to discard with each feed once the starter is mature. Just keep in mind that the starter will grow and you’ll need a larger container for it if you keep feeding it every day without removing any to use for baking.
Refrigerator Storage
For less frequent use, storage in the fridge is best. Refrigeration will slow down the fermentation process and your starter will only need to be fed once a week or so.
So for weekly use, like if you plan on having a weekly sourdough baking day, this is the way to go.
To prepare your starter for fridge storage: make sure it has been fed within the past 24 hours, then simply cover it with an airtight lid or plastic wrap, and store it in the fridge until the day before you are ready to use it again.
Reviving Your Starter after Refrigeration
Take the starter out of the fridge 12-24 hours before you plan on using it. Feed it, give it time to peak, and then it is ready to use.
If you forget about it and leave it in the fridge for a long time, it’s probably still ok. But it may take a few days of feeding regularly to revive it.

Rye Flour Sourdough Starter
Ingredients
Equipment
Method
- Use warm water if possible, but make sure it's no warmer than 110°F. The whole process of making a rye starter for the first time takes 8-12 days.
- Day 1: First step: In a glass or stoneware jar or bowl, combine ¼ cup water with ? cup rye flour (43 g rye flour). Stir with a wooden spoon until the flour is totally mixed into the water. The mixture will be a bit thick but should be easy to stir.
- If the starter seems too thick or clumpy, slowly add 1 tablespoon of water at a time until you reach the right consistency. If too thin, add 5 g flour at a time.
- Cover with a loose-fitting lid, tea towel, or doubled cheesecloth. If air can’t get in, fermentation activity won’t happen. I love this big weck jar for keeping my starter because I can just set the glass lid on top without the sealing ring and it works perfectly.
- Now that you’ve stirred water + flour together in your container and covered it, you’re finished for day 1.
- Set the starter on your kitchen counter at room temperature until day 2.
- Day 2: Uncover the starter and remove half of the contents, discard what you remove. You can toss the discard, add it to your scrap bucket for chickens/pigs/etc., or use it in sourdough discard recipes like these sourdough discard pancakes. This discarding step is the only step that’s different than day 1. It is not necessary to use a clean jar every day when you discard and feed the starter, continue using the same jar or bowl.
- Discarding half of the mixture is only necessary when you are establishing a new starter. Once the starter is mature, you will not need to discard half. You can just continue feeding it every day, but keep in mind that if you feed it daily without using any, you'll end up with a ton of starter and need a very large container.
- Next, add ? cup of flour and ¼ cup water to the remaining contents of the starter & stir until well combined.The flour-to-water ratio may be different than mine if you use a different flour, and that's okay.
- Cover and store the starter on the counter just like on day 1.
- Days 3-7: Repeat the steps from day 2.
- After a few days, you should notice that your starter almost doubles in size every 12-24 hours when after feeding it. You should also notice air bubbles on the top and that distinct sourdough smell.
- When it has risen to its highest point, this is called the "peak." After the starter peaks, it will slowly fall back down to where it was when you originally fed it, then it is ready to be fed again.
- If you notice your starter is "peaking" quickly (which is more likely to happen in the summer when your house is warm or if you store it in a warm spot) you may need to discard and feed more frequently than every 24 hours.
- If a starter peaks, falls, and sits for too long before being fed again, it may develop a "hooch" which is a thin layer of water near the top. Don't worry if you see this, it just means your starter is hungry and needs to be fed more frequently. Just dump the water when you discard, feed the remaining starter, and adjust your feeding schedule so it is fed more frequently.
- If you are feeding frequently, but not seeing much action or the starter develops a hooch every time it peaks and falls, try adjusting the flour-to-water ratio to increase the amount of flour so the starter is thicker when you feed it.
- Day 8: By now, the starter should be mature enough to attempt baking bread. It should peak 8-24 hours after feeding, have lots of bubbles, and have a sour, tangy smell. For the best results, the most important thing is to use the starter in sourdough recipes when it is "peaked." Once it falls, feed it and let it peak before using it again or it will take a long time to leaven the dough.
Nutrition
Notes
Temperature matters
A rye sourdough starter will peak faster at higher temperatures, so store your starter in a warm place – but not too warm or it will kill the bacteria and yeast – no warmer than 110F. In the winter, I use a proofing box set at about 80F when I need my starter to peak faster. In the warmer months, it peaks quickly on the kitchen counter.Keep bugs out
Use a rubber band or piece of twine to fasten the cloth around the neck of the jar you use to store your rye sourdough starter. This will prevent fruit flies from getting into the starter.Test the starter
Perform the float test to see if your rye sourdough starter is ready to use. Just drop a spoonful of sourdough starter into a cup of water. If it floats, it is ready to use.Less can be more
I have found that I have the best result when I keep only as much starter as I need. When I am ready to bake, I use almost all of the active starter so that all that's left in the jar is a very small amount (called the "scrapings"). I feed this tiny amount of starter and it peaks up perfectly.Hydration matters
Certain recipes will call for higher or lower hydration starter. The level of hydration of your starter just refers to how much water is in it. A lower hydration starter has less water, so it is thicker. A higher hydration starter has more water, so it is thinner. I prefer a higher hydration, thin starter for making pizza crust. But I prefer a lower hydration, thicker starter for making artisan bread.Don't throw it away
Sourdough starters are incredibly resilient and adaptable. They are almost impossible to kill. If your starter isn't performing well, some adjustments may need to be made to the feeding schedule, type of flour or water, ratio of flour and water, storage temperature, etc. But don't throw it away and start over! Just work with what you have. The only time I would throw a sourdough starter away is if it was black and moldy from top to bottom. Even if the top of the starter looks scary or a few bugs get in, just pour as much off the top as you can, transfer a tiny bit from the bottom into a clean jar, feed it, and proceed as usual. I have been keeping a starter for over 6 years and have never had to start over. I even accidentally baked my starter jar once! Luckily, there was a tiny little bit of the middle that was still liquid. I salvaged that little bit, fed it, and it was good as new!Tried this recipe?
Let us know how it was!Sourdough Recipes
Sourdough Artisan Bread Made Simple
Sourdough Chocolate Chip Cookies
Nowadays it’s hard to find information on how to start your own started from scratch in a way that is easy to understand! After days of investigating I finally found your YouTube channel which took me to this blog and all my questions were answered. Thank you!